
EP1000
Digital Fab & Prototyping Fundamentals
Web Development
HTML
Hypertext Markup Language (HTML) is the standard language used for documents to be displayed as a web browser. Typically HTML is coded in a text editor such as Sublime text 3, Notepad++, Visual Studio Code and many more.
The text editor I used was Atom. It is a free, open source software that is very beginner friendly.
Learning HTML for the first time, I started by watching videos from Jake Wright. Learn HTML in 12 Minutes and Learn more HTML in 12 minutes. After following the tutorial, I have learned a few important concepts that will help create my first website.
HTML consist of elements such as header, paragraphs , bullet point or numbered list, etc. These elements are presented in the form of tags like h1, h2, h3 for headers, p for paragraphs and many more. The elements are defined by being in <>, where the end of it is defined as </>. To start, create a text document and name it index. Convert the file to a .html file. It will look like this: index.html
<!DOCTYPE html>
<html>
  <head>
    <title>This is a title</title>
  </head>
  <body>
    <p>Hello world!</p>
	<img src: "file location" width = x px/> #Importing an image and resizing it
  </body>
</html>

#Elements with no closing tag will be represented like: <tagname/>
This format above is how the base of your HTML code should look like before starting to add any content.
The file location for the importing image is important as without it, the code will not know where to call for the photo from. Do keep in mind of the name of the photo as the code is cap sensitive. Example: selfie.jpg and Selfie.jpg can be interpreted differently by the code.
CSS
Following up from coding the base of my website, I needed to format the website to make it more appealing, that is where CSS comes in. Cascading Style Sheets (CSS) is a language used to describe how the html file will be presented. I proceeded to watch another of Jake Wright’s videos Learn CSS in 12 Minutes. Following Jack Wright’s template i have created my very first website. Similarly I used Atom for this task as well.
Common formatting areas:
- width: defined by x amount of px (pixel) for images
- Background colour: #XXXXXX, defined by a hexadecimal colour code
- font family: defines the font that will be used through out your website. E.g. Source code Pro
- Padding: Top px, left px, right px, bottom px. This defines the spacing between each division.
- Margins: margin-left and margin-right by x amount of pixels will align your division to the left or the right.
Here are some of the steps I followed from Jake Wright’s video:
- Start by designing the website layout on paper, this will give you a feel on how your end product should look like. Assign the required space for each component of your website.
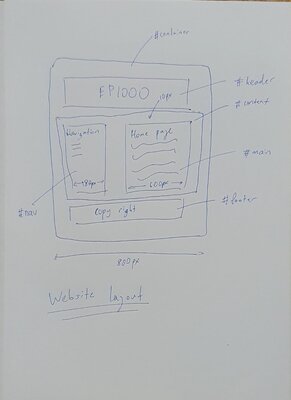
- Segment your HTML code in to divs/divisions and assign classes to the elements like your header, paragraphs, navigation bar, etc.
- Create a file and rename it
style.css. - Link the HTML file (index.html) to the CSS (style.css) file.
- In the CSS file, specify the sizes of each part of your website in pixels and assign the appropriate padding.
- Move the navigation bar to the side of your main content by float:left.
- Format the rest of the website by making aesthetic changes to the background, font family, etc.
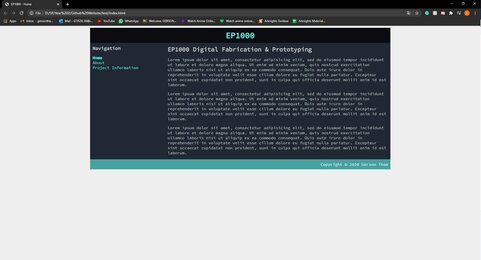
- Preview the website by dropping the html file into your web browser.
Web Development options
HTML/CSS
The very basic method of making a website from scratch where you have full control of everything from the content to how it looks. However, if you do not know how to code HTML or CSS, it could be a time consuming process to learn, code the website and format the website. It is also difficult to maintain and adding new pages can be a pain
Borrow a Template
We download an existing template, modify add and edit the contents to fit your needs. One can find fairly professional looking designs with well done up HTML/CSS codes. However, you will need knowledge of how to code HTML and CSS extensively to use this method.
Markdown
It is a pure text editor, a different editing language then HTML. Typing content with markdown is very easy however, if used on the website, will look very bare.
Jekyll
Jekyll is a static site generator which converts Markdown together with other instructions to HTML which is then hosted by the server. The content can be added through markdown and with the site generated, will look quite professional. The downside is you will need to understand every component of the website to fully control it.
For this specific website, I have decided to use the Jekyll method. Benefiting from both the ease of markdown and the professional look.